How “Sign in with Google” Really Works: OIDC and OAuth 2.0 Explained
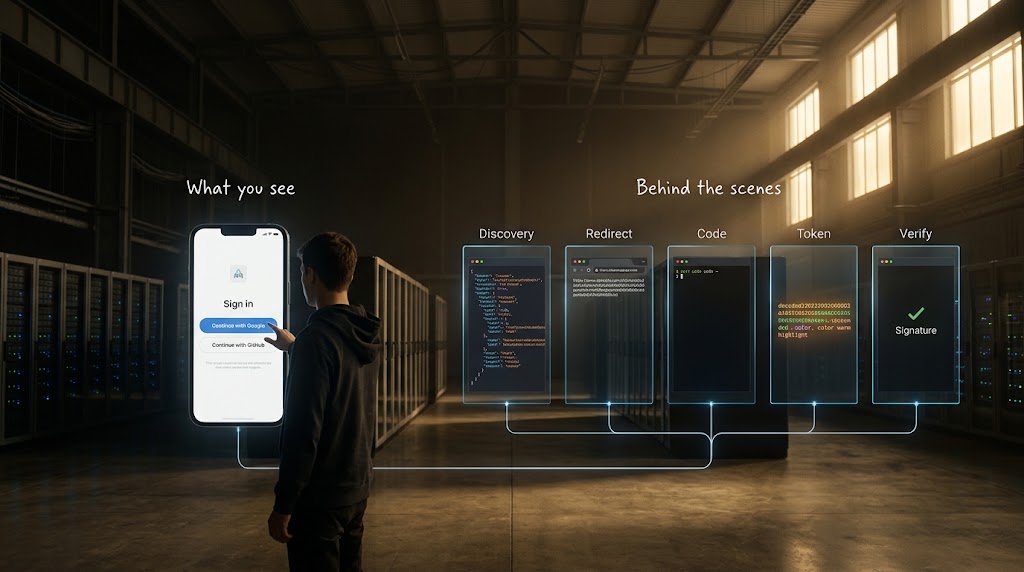
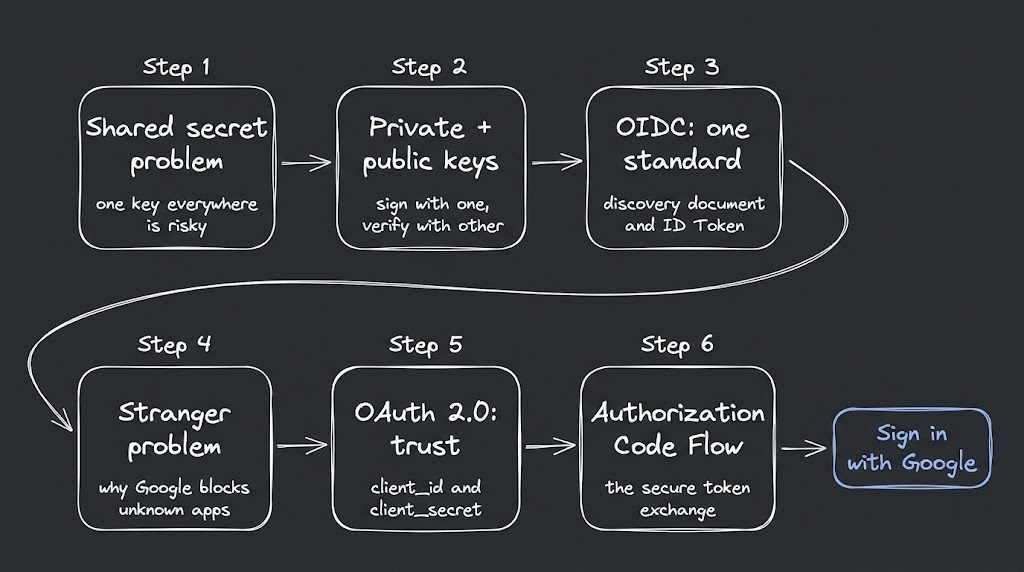
You have clicked "Sign in with Google" many times. One click and you are inside.
Most of us just install a library, paste a client_id and a client_secret, and it works. But that is the easiest part of the whole story.
The real engineering is what happens behind that button. In this blog I will explain it as a story. Every problem will lead to the next idea, so you never have to memorize anything.
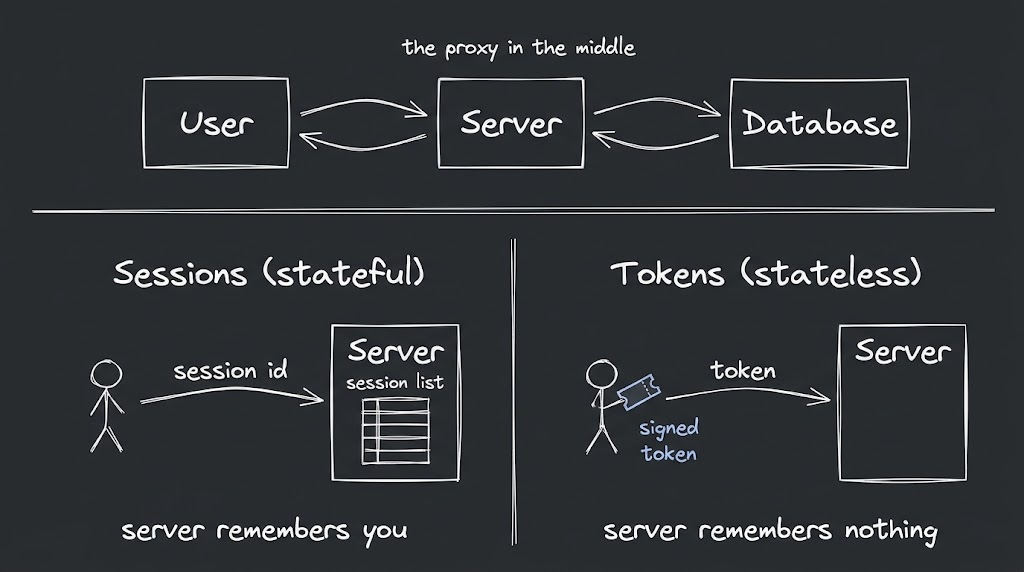
Step 1: The Server Is a Proxy
A user never talks to the database directly. The server stands in the middle.
It checks who the user is, and then it talks to the database for them.
So the first question for every server is: how do I remember who this user is?
There are two ways:
- Sessions (stateful): the server saves the login information and gives the user a session id. On every request, the server looks it up.
- Tokens (stateless): the server saves nothing. The user carries a signed token, and sends it with every request.
Tokens are very popular. But they bring a new problem.
Step 2: The Problem With One Shared Key
To sign a token, the simplest way is symmetric signing (for example HS256).
Symmetric means one key for everything. The same key creates the signature and also checks it.
const token = jwt.sign(payload, SECRET);   // create
const data  = jwt.verify(token, SECRET);   // verify with the same secret
This is fast and simple, and it is perfect for one server.
But big companies do not run one server. To understand why, we need to know two ways of building an application.
Monolith & Microservices
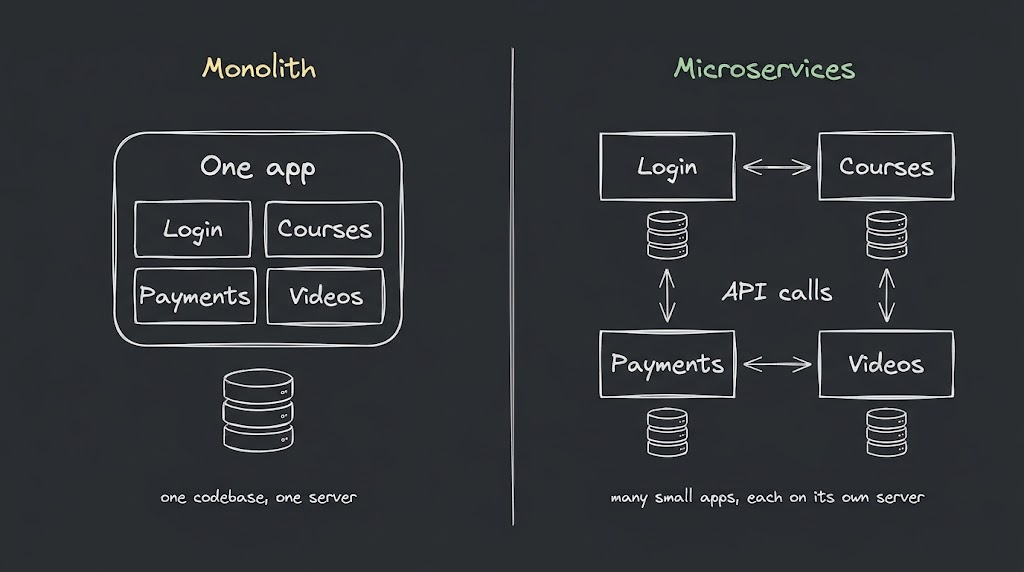
Monolith
A monolith is one big application. Everything lives in one codebase and runs on one server.
Think of a small online course website. Login, courses, payments and videos are all written in one project, and they all run together as one app.
Because everything is in one place, one secret is enough. The whole app knows it, and nothing else does.
Microservices
When a company grows, one big app becomes hard to manage. If the payment code breaks, the whole site can go down. So the company breaks the app into many small applications. Each one does only one job and runs on its own server. These are called microservices.
Now the same course website looks like this:
- a login service
- a courses service
- a payment service
- a video service
Each service is a separate application. They talk to each other through API calls.
Google is a big example of this idea. YouTube, Gmail, Drive, Play Store and Maps are different products, run by different teams, on different servers. But a user logs in only once, and every one of these needs to know who that user is.
So Where Is the Problem?
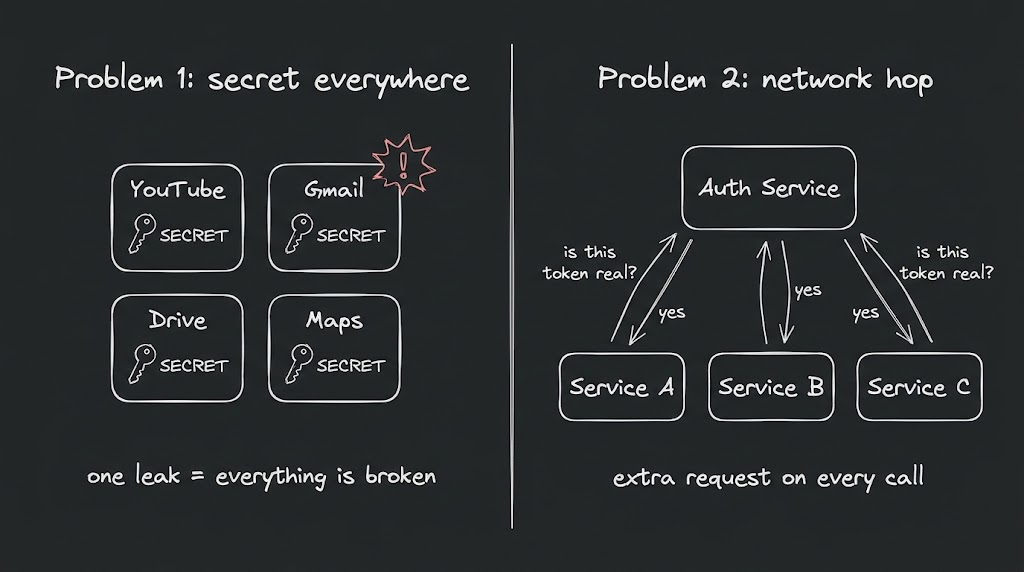
Every service must check the user’s token. If the token is signed with one shared secret, every service needs to know that secret. That brings two problems:
- Security. A secret that lives in many places will leak one day. Think about it: a new employee joins the YouTube team. Should they get the secret that signs every Google user’s token? Of course not. That is far too risky. But with a shared secret, every team must have it.
- Network hop. The other option is to keep the secret in one auth service only. Then every other service asks it, “Is this token real?” Every request needs one extra call to the auth service before it can continue. That is slow, and if the auth service goes down, everything stops. It also becomes a bottleneck, because every service depends on it.
So we need a way to check a token without knowing the secret, and without calling anyone.
Step 3: Asymmetric Keys
The solution is two keys instead of one:
- Private key: only the auth server has it. It signs the token.
- Public key: everyone can have it. It verifies the token.
// Auth server (only place with the private key)
const token = jwt.sign(payload, PRIVATE_KEY, { algorithm: "RS256" });

// Any other service (only needs the public key)
const data = jwt.verify(token, PUBLIC_KEY);
This is called asymmetric because the two keys are different.
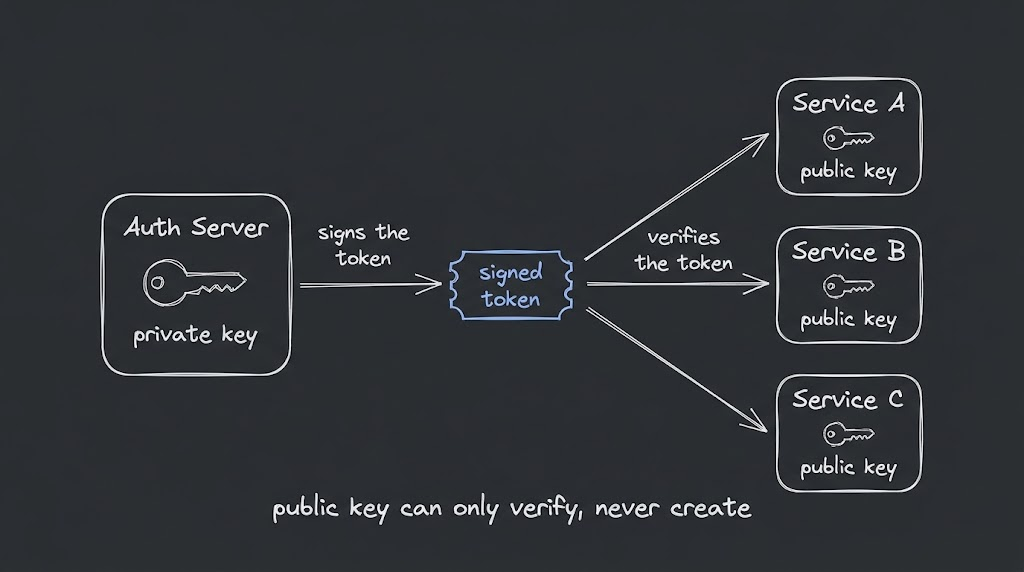
Now, no other service knows the private key. They only know the public key, and the public key can only verify. It cannot create or change a token.
That is why a company like Google can show its public key to the whole world. You can even open it yourself.
(In JWT this is called signing and verifying. The token is not hidden, but nobody can change it.)
Step 4: How Do We Share the Public Key?
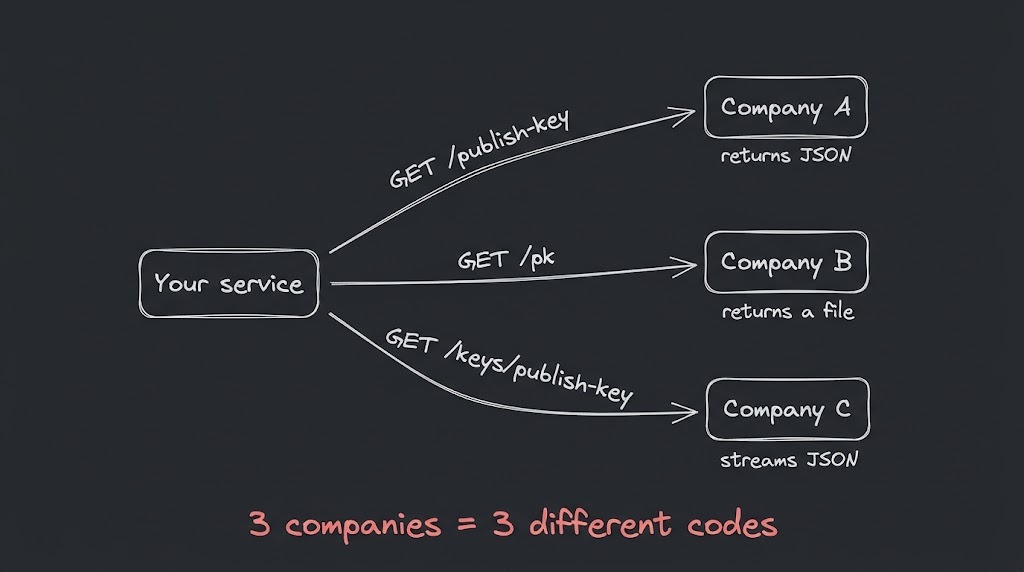
A new problem. If the company changes its private key, there is a new public key too. Now it must tell every service (like if it`s google it will tell youtube , map , drive etc all that), "please take the fresh key." Copying keys by hand does not work.
So the companies made a simple solution: publish the key on a URL. Services fetch it when they start, or when it expires (10 minutes, one month, anything).
Everyone liked this idea. Google, Microsoft and others all built it. But everyone built it in their own way:
- One used
GET /publish-keyand returned JSON. - Another used
GET /pkand sent a file. - Another used
GET /keys/publish-keyand streamed JSON.
If you wanted to trust three companies, you had to write three different codes. That is a mess.
Step 5: OIDC Brings the Standard
So the big companies sat together and said, "Let's make one standard way for all systems to share user information."
From that came
- SAML
- OIDC
SAML is older. OIDC is the modern and most common one.
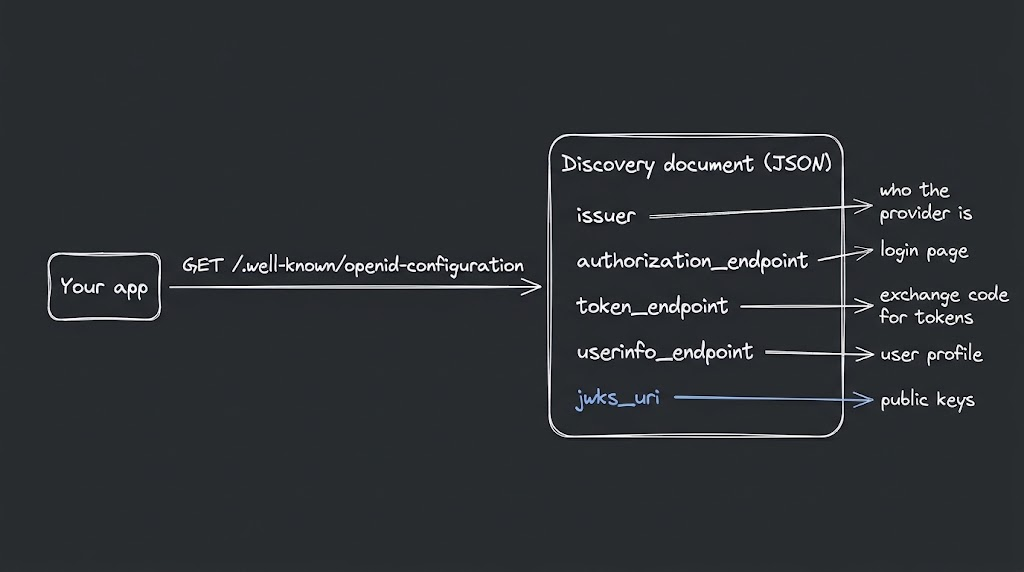
OIDC`s first rule is service discovery. Every provider must have this one fixed address:
GET /.well-known/openid-configuration
It returns a JSON that tells you everything. For example, you can open this in your browser:
https://accounts.google.com/.well-known/openid-configuration
Other companies like OpenAI also follow the same structure. That is what a standard means.
What Is Inside?
Here is a small example:
{
  "issuer": "https://auth.example.com",
  "authorization_endpoint": "https://auth.example.com/authorize",
  "token_endpoint": "https://auth.example.com/oauth/token",
  "userinfo_endpoint": "https://auth.example.com/oauth/userinfo",
  "jwks_uri": "https://auth.example.com/.well-known/jwks.json",
  "scopes_supported": ["openid", "profile", "email"],
  "response_types_supported": ["code"],
  "id_token_signing_alg_values_supported": ["RS256"]
}
What each one does:
- issuer: who is this provider. Every token carries this name.
- authorization_endpoint: the login page. You send the user here. You can call it sign in or login, the name does not matter.
- token_endpoint: where your backend exchanges a short code for the real tokens.
- userinfo_endpoint: gives you the user's profile.
- jwks_uri: where the public keys are.
- scopes_supported: what you are allowed to ask for (
openid,profile,email). - response_types_supported:
codemeans the Authorization Code flow, which we will see soon. - id_token_signing_alg_values_supported:
RS256means the token is signed with asymmetric keys.
The token itself is also standard. It always has the same fields, like sub (user id), email, name and exp (expiry), so every service reads it the same way.
JWK vs JWKS
You will see both names, and the difference is small.
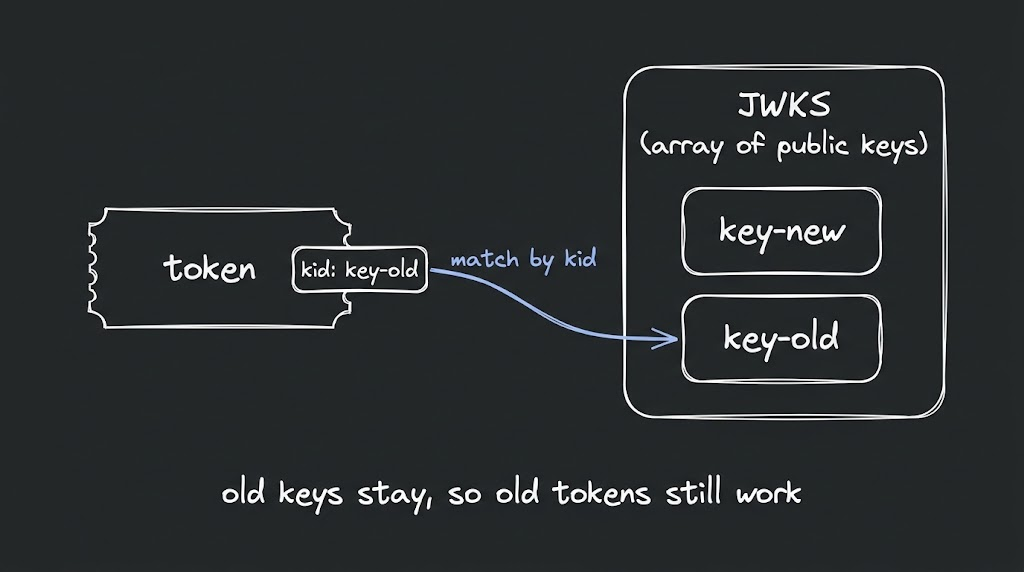
- JWK is one key.
- JWKS is a set of keys, an array.
Open the jwks_uri and you will see the public keys:
{
  "keys": [
    { "kid": "key-new", "kty": "RSA", "alg": "RS256" },
    { "kid": "key-old", "kty": "RSA", "alg": "RS256" }
  ]
}
Why Is It an Array?
Because companies change their private key sometimes. When they do, they do not delete the old public key. They keep it in the array.
Each token has a kid (key id) in its header. The service uses it to find the matching key. That way, old tokens still work, new tokens also work, and nothing breaks.
What Happens Inside a Request?
When you open YouTube while logged in:
- The service takes your token.
- It goes to
/.well-known/openid-configurationand finds thejwks_uri. - It downloads the public keys with a simple GET request.
- It picks the key that matches the
kid. - It checks the signature by itself.
This is the whole point. The service does not ask the auth server again and again. No secret is shared, and no extra network hop is needed.
Step 6: Why Can't We Open the Authorization Endpoint?
Try this. Copy the authorization_endpoint of a big company and open it. You will get an "invalid request" error.
But if you open YouTube, Maps or Drive, login works fine. Why?
Because OIDC is secure by default. Google's own apps are known and trusted. A stranger is not.
Your request fails because Google does not know who you are. It does not have your app registered, and it does not know where to send the user afterwards. It will not authenticate people for an unknown website.
It is the same with ChaiCode. If you log in once, you can move between MasterJi, TimeArena, SQL Labs and the courses without logging in again. They are all known to the provider. Outsiders are not.
That is great for security. But it creates a new question.
Step 7: What About Third-Party Apps?
Let's say you are building an app called jingalala.com.
Your first job is authentication. But building a really secure auth is hard. You have to save passwords safely, handle leaks, add two-factor, and stop bots. Usually it is not a good idea to do all this yourself.
Google already has a huge and secure auth system. So you think, "Why not take it from Google?"
- It is more secure than what I can build.
- The user does not enter details again, because Google already has them.
- The user does not need another password.
This is called Single Sign-On (SSO). One sign in, and you are signed in everywhere.
So jingalala.com wants to use Google's OIDC. But we just saw the problem. Google does not trust strangers, and jingalala.com is a stranger.
Google also wanted that other external services can use their auth for work. It wanted its auth to be a service for other apps. Other also want it to give as a service like Microsoft, LinkedIn and GitHub.
They needed a way to say, "This third-party app is trusted." That way is OAuth 2.0.
Step 8: OAuth 2.0 Makes a Stranger Trusted
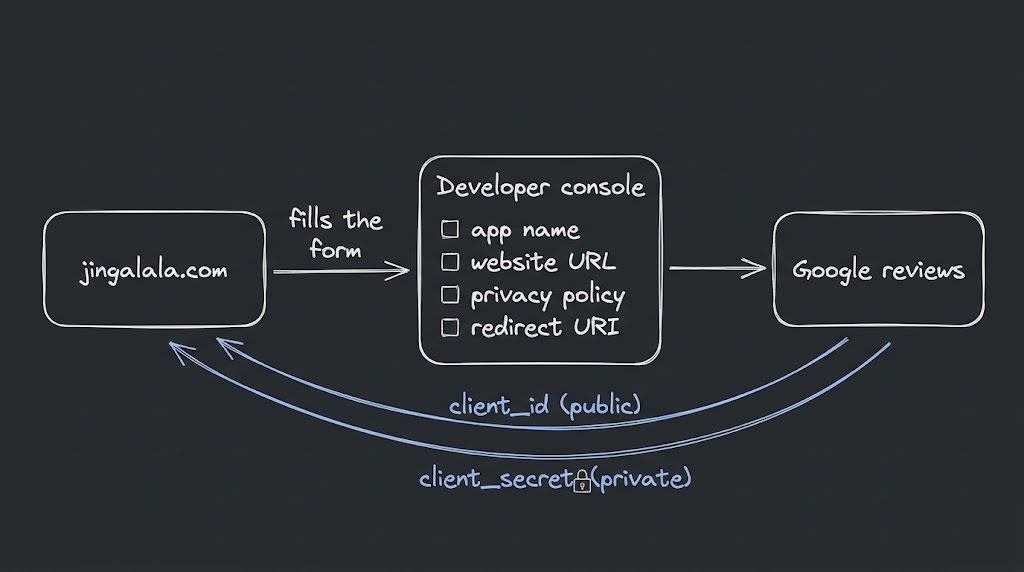
1. Register your app. jingalala.com goes to the developer console and fills a form:
- application name
- website URL
- privacy policy and terms
- what user data it needs
- where it is hosted
- redirect URI: where to send the user after login, for example
https://jingalala.com/api/redirect-uri
2. Get your keys. Google checks the form and gives two things:
- client_id: your app's public id.
- client_secret: your app's private password. Only your backend knows it.
Now Google knows jingalala.com. It is a trusted source.
3. Use client_id in every request.
https://auth.example.com/authorize
  ?client_id=JINGALALA_CLIENT_ID
  &redirect_uri=https://jingalala.com/api/redirect-uri
  &response_type=code
  &scope=openid email profile
Google uses the client_id to find your registered details. And that is how the user sees the familiar screen: "Do you want to continue with jingalala.com?" That text comes from the form you filled in.
A small correction people often miss: client_id is one per application, not per user. All users of jingalala.com use the same client_id, but another app has a different one.
If you remove the client_id from the URL, the request fails.
What if the client_id leaks? It is not a secret, so no big problem. Google will only send users back to the redirect URI you registered. Nobody can use your client_id to send users to their own website.
Step 9: Never Send the Token Through the Browser
After login, Google has to send the user back to jingalala.com. What if it sends the token in that redirect?
That is dangerous. The browser can show the token in the network tab, save it in history, or leak it through an extension. Anyone who gets it can act as the user.
So Google gives a short code instead. It lives for a very short time (usually 1min), and it is useless on its own.
Step 10: The Complete Flow, From Click to Logged In
Now we put everything together. Let's follow one real login on jingalala.com, step by step. We will see which URL is called, who calls it, and what comes back.
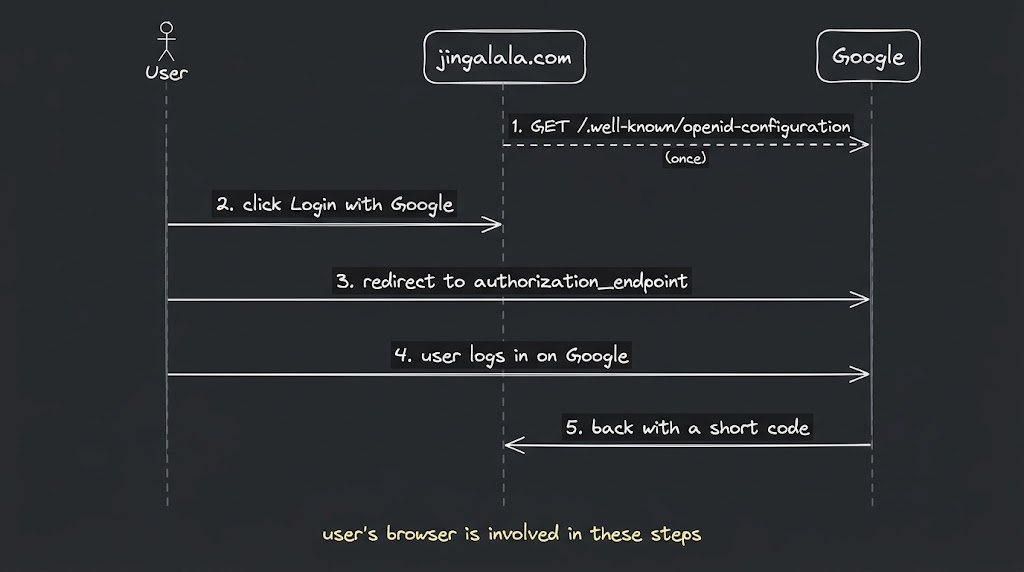
1. Find the Addresses (done once)
jingalala.com's backend does not know where Google's login page or token page is. So it asks the discovery address, which every OIDC provider has:
GET https://accounts.google.com/.well-known/openid-configuration
Google replies with the JSON we saw earlier. The backend picks out the four addresses it needs:
authorization_endpoint: where to send the user to log intoken_endpoint: where to exchange the codeuserinfo_endpoint: where to ask for the profilejwks_uri: where the public keys are
The backend saves these and does not ask again every time. Normally this happens once, when the server starts.
2. The User Clicks the Button
The user clicks "Login with Google" on jingalala.com.
3. Redirect to Google's Login Page
jingalala.com sends the user's browser to the authorization_endpoint from point 1, with its details in the URL:
https://accounts.google.com/o/oauth2/v2/auth
  ?client_id=JINGALALA_CLIENT_ID                          (who is asking)
  &redirect_uri=https://jingalala.com/api/redirect-uri    (where to come back)
  &response_type=code                                     (give me a short code)
  &scope=openid email profile                             (what data I want)
  &state=RANDOM_STRING                                    (protects against fake requests)
The scope is important. It decides what user data we are allowed to receive:
openid: required. It tells the provider "this is a login, give me an ID Token".profile: name, picture and similar details.email: email address and whether it is verified.
4. The User Logs In on Google
Google checks the client_id and the redirect_uri against what jingalala.com registered. If they match, it shows its own login page. Then it shows the screen: "Continue with jingalala.com? It will see your name, email and picture."
The user types the password on Google's page. jingalala.com never sees it.
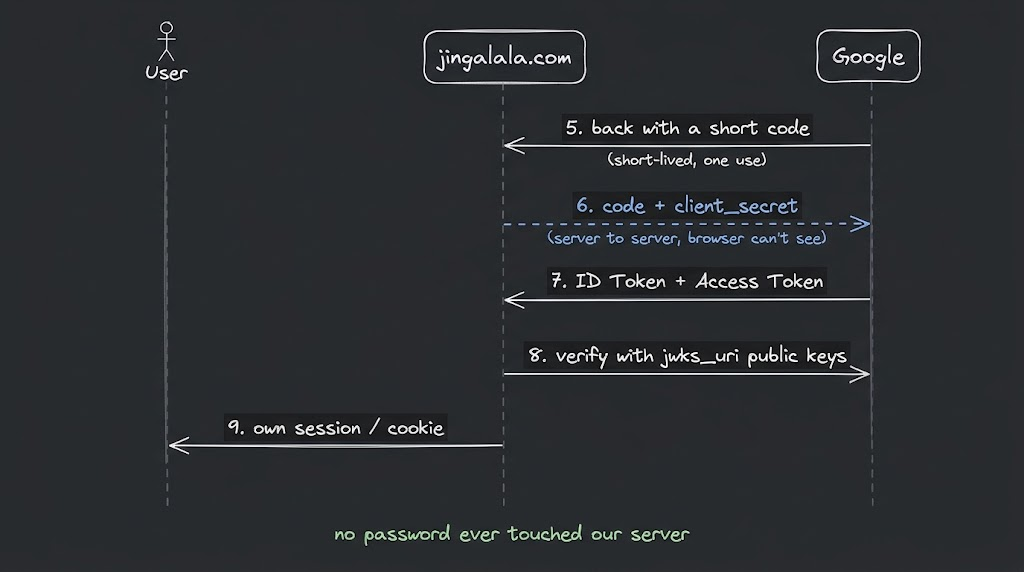
5. Google Sends the User Back With a Code
Google redirects the browser to the redirect_uri, with a short code in the URL:
https://jingalala.com/api/redirect-uri?code=SHORT_CODE&state=RANDOM_STRING
Our backend first checks that state is the same value it sent in point 3. Then it takes the code.
The code is not the token. It lives for a very short time (usually a minute or less), can be used only once, and is useless without the client secret.
6. The Backend Exchanges the Code (Server to Server)
Now jingalala.com's backend calls Google's token_endpoint directly. The browser is not part of this call:
POST https://oauth2.googleapis.com/token

grant_type    = authorization_code
code          = SHORT_CODE
client_id     = JINGALALA_CLIENT_ID
client_secret = JINGALALA_CLIENT_SECRET     (only the backend knows this)
redirect_uri  = https://jingalala.com/api/redirect-uri
Google checks the code and the secret. If everything is correct, it replies:
id_token      = eyJhbGciOi...    (who the user is)
access_token  = ya29.a0Af...     (to call Google's APIs for the user)
expires_in    = 3600
7. The Backend Verifies the ID Token
The id_token is a JWT, signed by Google with its private key. Our backend must not trust it blindly. It checks:
- It calls the
jwks_urifrom point 1 and downloads Google's public keys. - It picks the key that matches the
kidin the token header. - It verifies the signature. This proves the token was really made by Google and nobody changed it.
- It checks
iss: was it issued by Google? - It checks
aud: is it meant for ourclient_id? - It checks
exp: is it still not expired?
If any check fails, the login is rejected.
8. Read the User's Details
After verification, the data inside the ID Token can be trusted. The payload looks like this:
{
  "iss": "https://accounts.google.com",
  "aud": "JINGALALA_CLIENT_ID",
  "sub": "110169484474386276334",
  "name": "Abdul Rahman",
  "given_name": "Abdul",
  "family_name": "Rahman",
  "email": "abdul@gmail.com",
  "email_verified": true,
  "picture": "https://lh3.googleusercontent.com/...",
  "iat": 1790000000,
  "exp": 1790003600
}
What each one means:
sub: the user's unique id at Google. It never changes, so this is the safest id to save in your database.name,given_name,family_name,picture: come from theprofilescope.email,email_verified: come from theemailscope.iss,aud,iat,exp: who issued it, who it is for, when it was issued, and when it expires.
If you need more details than the token has, the backend can call the userinfo_endpoint and send the access_token with it. Google replies with the user's profile.
9. Create Your Own Session
Now Google's job is done. jingalala.com does its own work:
- It looks in its database for a user with this
sub(or email). - If there is no user, it creates one with the name, email and picture.
- It creates its own session or JWT and sends it to the browser in a secure cookie.
From now on, the user talks to jingalala.com with jingalala's own cookie. Google is not needed for every request.
The user is logged in, and jingalala.com never saw or stored a password.
So What Is the Difference?
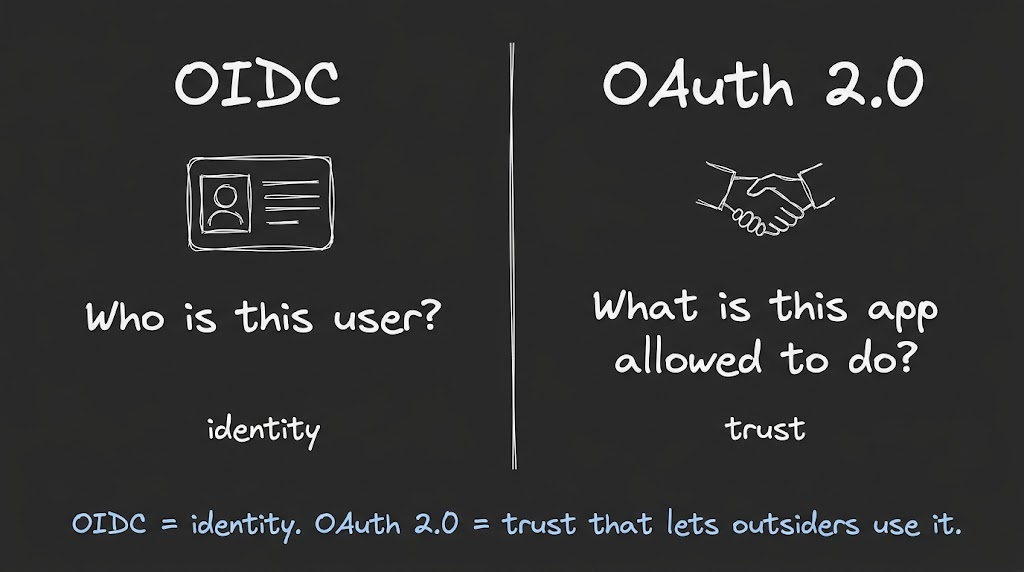
- OIDC = Authentication. It answers: "Who is this user?" For example: "This is Abdul Rahman, and this is his email." It gives us the discovery document, the ID Token and the keys.
- OAuth 2.0 = Authorization and trust. It answers: "What is this app allowed to do?" It lets outside apps be trusted to use the OIDC endpoints, with
client_id,client_secretand the code exchange.
(In real history OAuth 2.0 came first and OIDC was built on top of it. But this is how the two ideas fit together in practice.)
The three players in every login:
- Identity Provider: Google, GitHub, Auth0. It authenticates the user.
- Relying Party: your backend. It trusts the provider.
- End User: the person using your app.
Why It Is Worth It
- No passwords to store. You do not hash or save them, so a leak on your side is much less dangerous.
- Same profile format. Every provider gives user data in the same claim format.
- Single Sign-On. One login works across many apps.
- Security is handled for you. Two-factor and bot protection are done by the provider.
What Your Library Does for You
When you use Auth.js, Clerk, Auth0 or Okta, you only paste a client_id and a client_secret. Now you know what they do behind the scenes:
- read the discovery document
- redirect the user to the login page
- take the code and exchange it with the secret
- fetch the public keys and verify the ID Token
- create a session Pasting the id and secret is the last and easiest part. The real engineering is everything above.
Next time you see "Sign in with Google", you will know what really happens behind the button.
If you read this and understood it, you are already ahead of those who just skipped the article. Thanks for Reading .
About the author
I'm Abdul Rahman, a full stack developer and CS student. I write about software engineering.
- Portfolio: abdulrdeveloper.me
- Blog: blog.abdulrdeveloper.me
- GitHub: abdulrdeveloper
About the author
- CS student and full-stack developer from Pakistan. Building with JavaScript, TypeScript, React, Next.js and Node.js. Currently in ChaiCode Web Dev Cohort 2026.
Comments
Join the discussionNo comments yet. Be the first to comment.